How to start using Jenkins
In today’s fast-evolving software development landscape, continuous integration and continuous delivery (CI/CD) practices have become indispensable for maintaining efficiency and ensuring rapid, reliable product releases. Jenkins, an open-source automation server, stands out as one of the most popular and versatile tools to streamline these processes. Whether you are a developer, a DevOps engineer, or simply someone interested in automating your build and deployment workflows, learning how to start using Jenkins can transform your approach to software development. This article will guide you through the fundamental concepts, setup procedures, and essential best practices to begin your Jenkins journey with confidence and clarity.
From installation to configuring pipelines and managing plugins, each step will be explained in detail to help you grasp Jenkins basics effectively. By the end, you’ll not only know how to get Jenkins up and running but also understand how to harness its power to boost productivity and collaboration in your projects.
- Understanding What Jenkins Is
- Prerequisites: What You Need Before Getting Started
- Installing Jenkins: Step-by-Step
- Navigating the Jenkins Dashboard
- Creating Your First Jenkins Job
- Integrating Source Control with Jenkins
- Understanding and Using Jenkins Pipelines
- Managing Jenkins Plugins
- Configuring Build Triggers and Scheduling
- Setting Up Notifications for Build Results
- Securing Jenkins for Production Use
- Scaling Jenkins and Best Practices
- Conclusion
- More Related Topics
Understanding What Jenkins Is
Jenkins is an open-source automation server primarily used for automating parts of software development related to building, testing, and deploying. Initially released in 2011, it allows developers to integrate changes to a project continuously and deliver fresh builds on demand. The platform’s extensibility through plugins makes it highly adaptable to various environments and project requirements. Jenkins supports a wide range of tools and languages, making it a cornerstone in many CI/CD pipelines. Before diving in, it’s crucial to comprehend that Jenkins acts as a central hub where automated tasks are configured and triggered, reducing manual intervention and speeding up software delivery cycles.
Prerequisites: What You Need Before Getting Started
Before installing Jenkins, make sure you have the necessary prerequisites in place. First, you’ll need a machine or server with a supported operating system such as Linux, Windows, or macOS. Since Jenkins runs on Java, ensure that Java Development Kit (JDK) 8 or newer is installed. Familiarity with version control systems (VCS) like Git will also be helpful as Jenkins often integrates with them. Additionally, having basic command-line knowledge and understanding of software build tools (e.g., Maven or Gradle) will make the setup and configuration process smoother. Preparing your environment correctly sets the foundation for successful Jenkins usage.
Installing Jenkins: Step-by-Step
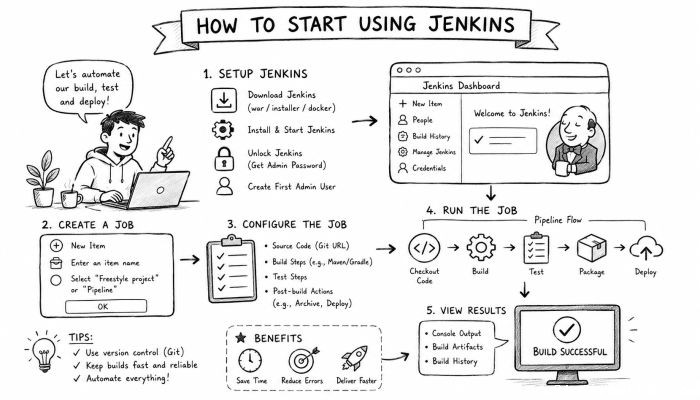
Installing Jenkins can be straightforward depending on your platform. For Linux users, Jenkins packages are available via official repositories. On Windows, an installer wizard simplifies the process. You can also run Jenkins as a Docker container for portability and easy scaling. Begin by downloading Jenkins from its official site or setting up the appropriate repository. After installation, start the Jenkins service, then access the web interface through a browser on port 8080 by default. Upon first launch, Jenkins asks for an initial administrator password located in a specified file on your system. Inputting this password unlocks Jenkins, allowing you to proceed with further setup.
Navigating the Jenkins Dashboard
Once you log in, the Jenkins dashboard greets you with an intuitive, user-friendly interface. The dashboard provides access to core features such as creating new jobs, viewing build history, managing plugins, and configuring system settings. Understanding the layout early on is crucial; the sidebar menu guides you to options like “New Item,” “Manage Jenkins,” and “People.” The main area displays a list of jobs and relevant information such as their build status and last run time. Familiarize yourself with this interface, as it will be your primary interaction point when working with Jenkins.
Creating Your First Jenkins Job
A "job" or “project” in Jenkins refers to a particular build or automation workflow. To create your first job, click on “New Item” in the dashboard, then enter a name and select the type of job you want (e.g., Freestyle project, Pipeline). Freestyle projects offer a flexible way to configure build steps like compiling code, running tests, or deploying applications. Once created, configure your job by specifying a source code repository, build triggers, and build steps. For example, you can integrate your Git repository so Jenkins builds your code automatically whenever changes are pushed.
Integrating Source Control with Jenkins
Source control management (SCM) integration is a core Jenkins functionality that facilitates automated builds triggered by code changes. Jenkins supports popular SCM systems such as Git, Subversion, and Mercurial. To integrate Git, you need to provide the repository URL and specify credentials if it’s private. You can configure polling or webhook triggers so Jenkins knows when new commits arrive. This setup enables continuous integration where builds occur automatically, allowing developers to catch issues promptly and improving overall code quality.
Understanding and Using Jenkins Pipelines
While freestyle jobs offer simplicity, Jenkins Pipelines provide more powerful and flexible automation capabilities. Pipelines allow users to define their build processes through code, written either using Declarative or Scripted syntax. Pipelines support complex workflows such as parallel builds, conditional stages, and post-build actions. They are stored as a Jenkinsfile in your source repository, enhancing traceability and versioning. Learning to write Jenkins pipelines enables you to create more maintainable and scalable build configurations that suit modern CI/CD practices.
Managing Jenkins Plugins
One of Jenkins’ strengths is its vast ecosystem of plugins that extend functionality. From integrating different tools to adding new build steps and reporting features, plugins customize Jenkins to fit your needs. Access plugins via “Manage Jenkins” → “Manage Plugins.” Here, discover available plugins, install or update them, and view installed plugins. Popular plugins include Git, Pipeline, Docker, and Slack notifications. However, be mindful to install only necessary plugins to avoid performance issues and maintain security.
Configuring Build Triggers and Scheduling
Build triggers help automate Jenkins jobs by specifying when builds should start. Common triggers include polling the SCM for changes at intervals, using webhooks for immediate triggers, or scheduling builds with cron syntax. Configuring triggers reduces manual build initiation and supports continuous integration flows. For instance, setting a webhook from GitHub can instantly start a build once a commit is pushed, ensuring that testing and deployment happen quickly and reliably.
Setting Up Notifications for Build Results
Keeping your team informed about build status is vital for maintaining momentum in development. Jenkins supports multiple notification mechanisms including email, chat integrations, and custom scripts. Configuring email notifications requires setting SMTP server details and specifying recipients. Alternatively, plugins can send build status messages to Slack, Microsoft Teams, or other communication platforms. Timely notifications help developers immediately respond to failures or successful deployments, enhancing collaboration and reducing downtime.
Securing Jenkins for Production Use
As Jenkins often controls critical automation pipelines, security must not be overlooked. Begin by setting up user authentication and authorization, defining who can read, build, or administer jobs. Jenkins integrates with LDAP, Active Directory, and offers matrix-style security for fine-grained control. Always install the latest security updates and plugins. Limiting access to sensitive credentials and using credentials-binding plugins prevents leaks. Moreover, running Jenkins behind a secure reverse proxy (such as Nginx or Apache) using HTTPS enhances protection from external threats.
Scaling Jenkins and Best Practices
As your projects grow, Jenkins can scale with you by adding more build agents (nodes) to distribute workloads. Configuring master-agent setups enables parallel builds and faster pipeline execution. Use declarative pipelines and shared libraries to promote reuse and consistency. Regularly back up your Jenkins configuration and job data to prevent loss. Monitoring Jenkins health and performance helps preempt issues. Finally, engage with the Jenkins community or consult official documentation for updates and best practices to continually improve your automation process.
Conclusion
Starting to use Jenkins is a transformative step in modern software development, enabling teams to adopt continuous integration and continuous delivery practices efficiently. By understanding what Jenkins offers, installing it properly, and mastering its core features such as job configuration, source control integration, and pipeline scripting, you establish a robust foundation for automating your workflows. Plugins, build triggers, and notifications further enhance Jenkins’ capabilities, ensuring smooth, automated operations. Equally important is securing Jenkins and scaling it to meet team demands. With Jenkins powering your automation, you can accelerate development cycles, improve software quality, and foster stronger collaboration — all critical goals in today’s agile environments. Embarking on your Jenkins journey with clear guidance and best practices paves the way for sustained success and continuous innovation.
 How to Make the Most of Your Holiday Break
 The Best Winter Destinations for a Cozy Getaway
 How to Organize Your Holiday Travel Plans with Ease
 The Ultimate Guide to Cooking for a Crowd
 How to Make Healthy Comfort Food Without the Guilt
 5 Delicious Vegan Breakfast Ideas You Can Make in Minutes