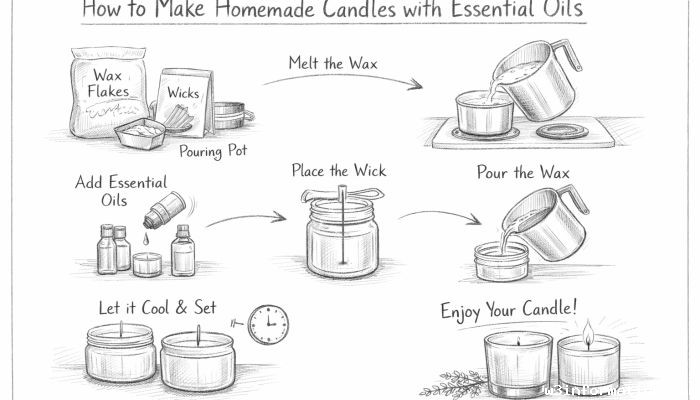
How to Make Homemade Candles with Essential Oils
Candles have long been cherished not only for their warm, flickering light but also for their ability to create inviting, soothing atmospheres. In recent years, candle-making has blossomed into a beloved craft, blending creativity with functionality. Making your own candles at home allows you to customize scents, colors, and styles to match your personal preferences or to give as thoughtful gifts. Using essential oils in your candles elevates this experience by incorporating natural aromas that can uplift your mood, promote relaxation, or energize your space. This article will guide you step-by-step through the process of making homemade candles infused with essential oils, from selecting materials to mastering pouring techniques. Whether you're a beginner or looking to refine your skills, discover how to craft beautiful, aromatic candles that fill your home with warmth and wellness.
- Understanding the Basics of Candle Making
- Choosing the Right Wax for Your Candles
- Selecting and Preparing Essential Oils
- Tools and Equipment Needed for Homemade Candles
- Preparing Your Work Area: Safety and Cleanliness
- Melting the Wax: Step-by-Step Process
- Adding Essential Oils to Melted Wax
- Preparing and Placing Wicks Correctly
- Pouring Wax into Containers
- Cooling and Setting Your Candle
- Testing and Troubleshooting Your Homemade Candles
- Customizing Candles with Colors and Decorative Elements
- Conclusion
- More Related Topics
Understanding the Basics of Candle Making
Before diving into candle creation, it’s important to grasp the fundamental components. Candles generally consist of wax, a wick, and a fragrance. Wax serves as the fuel that melts and releases scent as the candle burns. Wicks act as the candle’s lifeline, drawing melted wax upward to sustain the flame. Essential oils introduce natural scents derived from plants, offering a more authentic aromatic experience compared to synthetic fragrances. Awareness of how these ingredients interact helps in producing quality candles that burn evenly and smell wonderful. This foundational knowledge sets the stage for a successful candle-making project.
Choosing the Right Wax for Your Candles
Selecting the appropriate wax is crucial for candle performance and scent throw. Common wax types include paraffin, soy, beeswax, and palm wax. Soy wax is favorite among homemade candle enthusiasts for its natural origin, eco-friendliness, and excellent scent retention, particularly with essential oils. Beeswax burns longer and produces a natural honey aroma of its own but can compete with essential oil scents. Paraffin wax, derived from petroleum, offers vibrant colors and good scent throw but doesn’t align with eco-conscious values. Understanding the advantages of each wax type helps you choose the ideal medium for your essential oil-infused candles.
Selecting and Preparing Essential Oils
Essential oils are the heart of scented candle-making. Extracted from flowers, herbs, fruits, or trees, these oils provide diverse fragrance profiles and therapeutic benefits. Popular oils for candles include lavender, eucalyptus, peppermint, and citrus blends. When choosing oils, consider their flash point—the temperature at which they can evaporate or become flammable—to ensure safety during candle making. It’s also important to use pure, high-quality essential oils without additives. Prepare your essential oils by measuring precise amounts, usually between 6% to 10% of the wax weight, to achieve a balanced scent without overpowering the candle.
Tools and Equipment Needed for Homemade Candles
Equipping yourself with the right tools makes the candle-making process smooth and safe. Basic supplies include a double boiler or a melting pot, heat-resistant containers (glass jars or metal tins), thermometer, stirring utensils, and wick holders or centering devices to keep wicks upright while pouring. Gloves and protective eyewear add safety when handling hot wax. Measuring scales and pouring pitchers help with precise measurements and clean transfers of melted wax. Having all tools at hand before beginning work ensures efficient progress and yields professional-looking candles.
Preparing Your Work Area: Safety and Cleanliness
A well-prepared workspace is essential for enjoyable and accident-free candle making. Choose a flat, stable surface protected with newspaper or silicone mats to prevent wax stains. Ensure the area is well-ventilated, especially when working with heated wax and essential oils. Keep a fire extinguisher or baking soda nearby to handle unexpected flame surges. Avoid wearing loose clothing that could catch fire. Organize your materials beforehand, and clean spills promptly to maintain a safe, clutter-free zone. Prioritizing safety practices fosters confidence during this creative process.
Melting the Wax: Step-by-Step Process
Melting wax is the core step in candle making where precision really matters. Use a double boiler to avoid direct heat, which can burn or degrade the wax and essential oils. Slowly heat the wax until it reaches the recommended melting point, generally between 170°F to 185°F depending on the wax type. Stir gently to maintain uniformity, and monitor the temperature using a thermometer. Avoid overheating, as it can discolor wax and reduce scent quality. Once fully melted, remove from heat and prepare to mix in your essential oils. Mastering this phase ensures smooth, aromatic candles.
Adding Essential Oils to Melted Wax
To preserve the fragrance and therapeutic properties of essential oils, timing and temperature are key. Add essential oils after the wax has melted but before it cools below 140°F, as adding them too hot can cause the oils to burn off, and too cold can result in poor fragrance dispersion. Stir the mixture gently but thoroughly for at least 30 seconds to 1 minute to ensure even distribution of scent throughout the wax. Avoid aggressive stirring that creates bubbles. This careful blending enhances the candle’s aromatic performance and longevity.
Preparing and Placing Wicks Correctly
The wick influences how your candle burns, so proper selection and placement are vital. Wick size depends on container diameter and wax type—the right wick will produce a steady flame without excessive smoke or tunneling. Attach wicks to the container’s bottom using wick stickers or a dab of hot glue. Use wick centering devices or household items like pencils to keep wicks straight and centered as you pour the wax. Anchoring the wick firmly prevents it from drifting during cooling, helping your candle burn uniformly.
Pouring Wax into Containers
Pouring melted wax is a delicate yet satisfying action. Allow the wax to cool slightly so it’s between 130°F and 145°F before pouring, which minimizes cracking and shrinkage. Slowly pour the wax into containers, leaving some space at the top for finishing touches. Pour steadily to avoid air bubbles and uneven layers. After pouring, secure the wick and let the candle cool at room temperature undisturbed. Proper pouring and cooling result in smooth surfaces and aesthetically pleasing candles.
Cooling and Setting Your Candle
Cooling is a critical phase during which the candle solidifies and the scent settles. Keep the candle in a draft-free area at room temperature to prevent cracks or frosting. Cooling times can vary from a few hours to overnight depending on candle size. Avoid moving the candle prematurely, as shifting can create uneven surfaces or cause the wick to misalign. Once fully set, trim the wick to about ¼ inch to prepare your candle for safe, clean burning.
Testing and Troubleshooting Your Homemade Candles
Once your candle is ready, performing a test burn helps identify any issues. Light it for about 2-3 hours to observe the flame size, melting pool, and scent throw. A well-made candle produces a consistent flame, melts wax evenly across the top, and releases a pleasant aroma. If the wick smokes excessively, you might need a smaller wick. If the scent is weak, consider increasing essential oil percentage or selecting stronger oils next time. Troubleshooting common problems ensures your future candles will perform perfectly.
Customizing Candles with Colors and Decorative Elements
Beyond fragrance, candles offer a canvas for creativity. Consider adding natural colorants like mica powders or plant-based dyes to enhance visual appeal. Layered candles use different colored waxes poured sequentially for a striking effect. You can also embed dried flowers, herbs, or glitter safely in the wax for unique textures. However, ensure any additives do not affect burning safety. Decorating homemade candles adds a personal signature, making them ideal gifts or décor pieces that reflect your style and intent.
Conclusion
Creating homemade candles infused with essential oils is both a rewarding craft and a pathway to enriching your living environment with natural fragrances and cozy light. By understanding candle basics, choosing quality materials, and mastering each step—from melting wax to perfecting the scent blend—you can produce beautiful, aromatic candles tailored to your taste. Safety and patience during preparation guarantee satisfying results, while thoughtful customization allows your creativity to shine. Whether experimenting with different waxes, essential oils, or designs, candle-making is an expressive endeavor that brightens your home and spirit alike. Embrace this timeless art, and let your senses delight in the glow of your own handcrafted creations.
 Big O Notation Explained for Beginners
 AI in Gaming: Smarter NPCs and Environments
 Understanding Bias in AI Algorithms
 Introduction to Chatbots and Conversational AI
 How Voice Assistants Like Alexa Work
 Federated Learning: AI Without Sharing Data