How to Make Your Own Handmade Soap at Home
In today’s world of mass-produced goods, there’s a special satisfaction in creating something unique and personal with your own hands. Handmade soap is more than just a cleansing product—it’s an expression of creativity, a pathway to natural living, and a way to control exactly what goes on your skin. Making soap at home allows you to customize ingredients, scents, and textures, ensuring a gentle and nourishing experience. Whether you want to avoid harsh chemicals, reduce waste, or gift something heartfelt, crafting your own soap can be a rewarding and enjoyable endeavor. This article will guide you through the entire process, from understanding soap-making basics to mastering advanced techniques, empowering you to create beautiful, effective, and fragrant soaps in the comfort of your kitchen.
- Understanding the Basics: What is Soap?
- Essential Ingredients for Handmade Soap
- Safety First: Handling Lye and Protective Measures
- Tools and Equipment You'll Need
- Choosing the Soap-Making Method: Cold Process vs. Melt and Pour
- Preparing Your Workspace for Soap-Making
- The Step-by-Step Process of Cold Process Soap Making
- Adding Natural Colorants and Scents
- The Importance of Curing and Storage
- Troubleshooting Common Soap-Making Problems
- Personalizing Your Soap: Creative Additions and Gift Ideas
- Sustainability and Environmental Benefits of Handmade Soap
- Conclusion
- More Related Topics
Understanding the Basics: What is Soap?
Soap is the product of a chemical reaction called saponification, where fats or oils combine with an alkali to create a cleansing agent. Traditionally, soap consists of fatty acids derived from vegetable oils or animal fats, merged with a strong base like sodium hydroxide (lye). This reaction produces soap molecules which have hydrophobic (water-repelling) and hydrophilic (water-attracting) ends, allowing dirt and grease to be lifted from surfaces and washed away. Learning this foundation helps you appreciate the necessity of precise measurements and safety precautions during soap-making.
Essential Ingredients for Handmade Soap
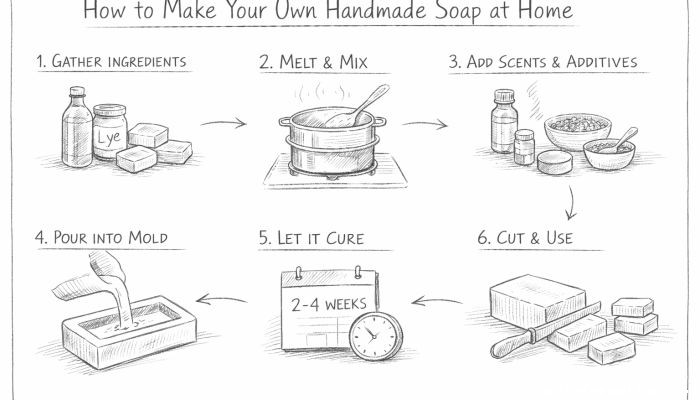
The core ingredients in soap-making include oils or fats, an alkali (usually sodium hydroxide), water, and optional additives such as fragrances, colorants, and exfoliants. Common oils like olive oil, coconut oil, and palm oil each contribute distinct properties—olive oil imparts moisturizing qualities, coconut oil adds cleansing power, and palm oil lends hardness to the final bar. Choosing the right combination affects the texture, lather, and moisturizing ability of your soap, making ingredient selection a key step.
Safety First: Handling Lye and Protective Measures
Lye (sodium hydroxide) is caustic and can cause severe burns if mishandled. Ensuring safety is paramount when working with lye: always wear rubber gloves, long sleeves, and eye protection, and work in a well-ventilated area. Pour lye into water (never the reverse) to dissolve safely, and keep vinegar nearby to neutralize any accidental spills on the skin. Understanding and respecting the dangers transforms soap-making from a risky experiment into a safe and enjoyable craft.
Tools and Equipment You'll Need
Successful soap-making requires a few specialized tools to ensure accuracy and safety. Essential items include a digital kitchen scale for precise measurements, a heat-resistant container for mixing lye water, stainless steel or heavy-duty plastic utensils, a thermometer, and molds to shape your soap. Avoid aluminum or reactive metal containers when mixing lye. Having the right equipment streamlines the process and improves the quality of your handmade soap.
Choosing the Soap-Making Method: Cold Process vs. Melt and Pour
There are several methods to make soap, with cold process and melt-and-pour being the most common among hobbyists. Cold process involves mixing oils and lye water at controlled temperatures, then pouring into molds to cure for several weeks. This method offers complete control over ingredients and results in a longer-lasting, more natural bar. Melt and pour, on the other hand, uses pre-made soap bases that you melt, customize with additives, then remold—reducing time and complexity but limiting ingredient control. Each method has unique benefits that cater to different preferences and skill levels.
Preparing Your Workspace for Soap-Making
Organization is key to smooth soap-making. Clear your workspace of distractions, cover surfaces with newspaper or silicone mats, and keep all tools and ingredients within reach. Have a cleaning plan ready since soap can be sticky and lye solutions corrosive. A well-prepared environment enhances safety, efficiency, and the overall experience, setting the stage for success.
The Step-by-Step Process of Cold Process Soap Making
Cold process soap-making begins by weighing your oils and heating them to a uniform temperature. In a separate container, carefully mix lye with water until dissolved. When both mixtures reach around 100°F, slowly combine lye water with oils while stirring continuously. Using an immersion blender accelerates the process until the mixture reaches “trace,” appearing like pudding. At this stage, add fragrances, colorants, or exfoliants if desired. Pour the soap batter into molds, cover, and insulate for 24 to 48 hours before unmolding and curing.
Adding Natural Colorants and Scents
One of the joys of handmade soap is experimenting with natural colors and scents. Clays, spirulina powder, turmeric, and activated charcoal offer vibrant, earthy hues without synthetic dyes. For fragrance, essential oils like lavender, peppermint, and tea tree not only smell amazing but also provide therapeutic benefits. Careful selection and dosing of additives ensure your soap remains skin-friendly and aromatic, providing a multi-sensory experience.
The Importance of Curing and Storage
Freshly unmolded soap is soft and contains excess water, so curing is essential to solidify the bar and improve its longevity. Place bars on a rack in a dry, cool, well-ventilated area for 4 to 6 weeks. During curing, water evaporates, resulting in a harder, longer-lasting bar with a milder finish. Proper storage after curing—cool, dry, and away from light—preserves fragrance and quality. Patience during curing ensures your soap reaches its optimal condition.
Troubleshooting Common Soap-Making Problems
Even seasoned soap-makers face hiccups. Soap can seize (thicken too quickly), separate, develop spots, or become brittle if temperatures are off, measurements are imprecise, or ingredients incompatible. Maintaining consistent temperatures, thoroughly measuring ingredients, and following recipes closely are key to avoiding issues. If problems arise, examining each step and ingredient can reveal solutions, helping you improve in future batches.
Personalizing Your Soap: Creative Additions and Gift Ideas
Handmade soap is a blank canvas for creativity. Embed dried flowers, exfoliating oats, or swirls of multiple colors to make each bar unique. Packaging your soap with recycled paper, twine, and handmade labels elevates it into a thoughtful gift or boutique product. Experimenting with shapes, textures, and themes lets you craft soap that reflects your personality or the preferences of recipients, making handmade soap not just practical, but a delight to give and receive.
Sustainability and Environmental Benefits of Handmade Soap
Choosing to make soap at home supports sustainability in multiple ways. It reduces packaging waste by avoiding plastic-wrapped commercial soaps, allows use of biodegradable and ethically sourced ingredients, and minimizes exposure to synthetic chemicals that can harm the environment. Crafting your own soap encourages mindful consumption, connecting you to the ecology of everyday products and fostering a greener lifestyle.
Conclusion
Making your own handmade soap at home is a deeply rewarding journey blending science, creativity, and sustainability. From understanding saponification and handling lye safely to exploring natural additives and perfecting the curing process, every step offers valuable learning and satisfaction. Not only do you gain a personalized, chemical-free product tailored to your skin’s needs, but you also contribute to reducing waste and supporting mindful living. Whether you embark on soap-making as a hobby, a gift-making craft, or a budding business venture, the skills and insights you acquire offer endless opportunities for growth and expression. Embrace the art of soap-making and transform a daily routine into a nurturing ritual steeped in tradition and individuality.
 Big O Notation Explained for Beginners
 AI in Gaming: Smarter NPCs and Environments
 Understanding Bias in AI Algorithms
 Introduction to Chatbots and Conversational AI
 How Voice Assistants Like Alexa Work
 Federated Learning: AI Without Sharing Data