How to Make Homemade Pottery as a Beginner
Pottery is an ancient craft that has fascinated humans for thousands of years, blending creativity, functionality, and tradition into beautiful and practical art. For beginners, the idea of shaping clay into unique forms can seem daunting, but with the right guidance and mindset, homemade pottery can become an incredibly rewarding hobby. Whether you’re aiming to create decorative bowls, vases, or simple cups, the process of making pottery nurtures patience, mindfulness, and artistic expression. This article will walk you through everything you need to know to start making your own pottery at home, from selecting materials to mastering basic techniques, and finishing your pieces like a pro. By the end, you’ll not only understand the essential steps involved but also feel inspired to embark on your own creative pottery journey.
- Understanding the Basics of Pottery
- Choosing the Right Clay for Beginners
- Essential Tools and Materials for Homemade Pottery
- Preparing Clay for Shaping
- Hand-building Techniques for Beginners
- How to Use a Potter’s Wheel: Getting Started
- Drying and Preparing Pottery for Firing
- The Firing Process Explained
- Applying Glaze and Decorating Your Pottery
- Caring for Your Homemade Pottery
- Troubleshooting Common Pottery Problems for Beginners
- Finding Inspiration and Advancing Your Pottery Skills
- Conclusion: The Joy and Fulfillment of Homemade Pottery
- More Related Topics
Understanding the Basics of Pottery
Before diving into the practicalities of making pottery, it’s important to grasp the foundational concepts. Pottery involves shaping clay into objects and then hardening them through drying and firing. There are different types of clay—such as earthenware, stoneware, and porcelain—each with unique properties. Beginners often start with earthenware due to its ease of use and lower firing temperatures. Additionally, the pottery process may include hand-building techniques or using a potter’s wheel. Familiarizing yourself with these basics helps set realistic expectations and makes the learning curve less intimidating as you begin crafting your first pieces.
Choosing the Right Clay for Beginners
Selecting the right clay is crucial for a beginner’s success. Many recommend using air-dry clay or low-fire clay as a starting point because they do not require specialized kilns, making them accessible for home use. Air-dry clay hardens naturally by exposure to air, while low-fire clays need kiln firing at lower temperatures but offer more durability. If you opt to buy clay from a craft store, look for “beginners’ clay” or “non-toxic clays” that are easy to work with and forgiving of errors. Remember, the clay’s texture, moisture content, and firing requirements will influence your project’s outcome, so choose accordingly.
Essential Tools and Materials for Homemade Pottery
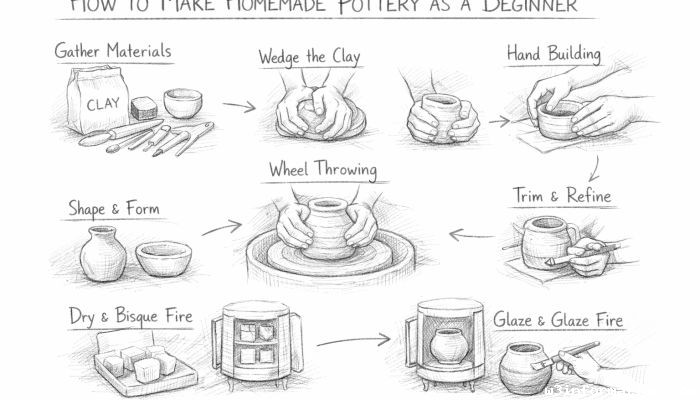
Starting with the right tools makes the pottery-making process smoother and more enjoyable. At a minimum, beginners should have basic items such as a rolling pin, cutting wire, needle tool, rib (a flat tool for smoothing), sponge, and a work surface like a canvas board or wooden table. You might also want to invest in clay modeling tools, which come in sets, to help shape and add details. Aside from tools, gathering materials like slip (liquid clay for joining pieces), glaze for finishing, and possibly a kiln if you plan to fire your creations will expand your options. However, many simple projects can be done with just clay and hand tools.
Preparing Clay for Shaping
Proper preparation of your clay is essential to avoid cracking and achieve even textures. The process called “wedging” involves kneading the clay much like dough to remove air bubbles and create a uniform consistency. Air trapped inside can cause your piece to explode when fired, so take the time to wedge carefully. To wedge, press and fold the clay repeatedly on a clean surface until it feels smooth and pliable. This also warms the clay, making it easier to manipulate. Prepared clay is the foundation of successful pottery, so don’t skip this step!
Hand-building Techniques for Beginners
Hand-building is an excellent starting point for new potters because it doesn’t require a wheel and uses simple methods to create shapes. The three main hand-building techniques are pinching, coiling, and slab building. Pinching involves shaping the clay with your fingers directly, usually to form small bowls or cups. Coiling builds shapes by stacking and smoothing rolled clay ropes, perfect for taller vessels. Slab building uses flattened clay sheets cut into shapes and assembled like a puzzle. Each technique offers creative freedom and teaches valuable skills like joining clay segments and refining textures, setting the groundwork for more advanced pottery skills.
How to Use a Potter’s Wheel: Getting Started
If you want to take your pottery to the next level, learning to use a potter’s wheel is a rewarding challenge. A wheel spins the clay, allowing you to form symmetrical, round pieces with speed and precision. Start by centering your clay on the wheel—a fundamental step where the clay is pressed and shaped to rotate evenly. Using wet hands, you can then gently pull the clay upwards or outwards to create bowls, cups, or plates. Though it takes practice to master wheel throwing, many beginners find the tactile and rhythmic process meditative and enjoyable. Local studios often offer wheel workshops, or affordable mini wheels can be purchased for home use.
Drying and Preparing Pottery for Firing
Once shaped, your pottery must dry slowly and evenly to prevent warping or cracking. Drying time varies depending on the clay’s thickness, humidity, and temperature. It’s best to cover pieces lightly with plastic during initial drying to regulate moisture loss, then gradually expose them to air. When your pottery is completely dry and no longer cool or soft to the touch, it is ready for firing. Some beginners use air-dry clays and can skip firing, but kiln firing is essential for durability and to prepare pieces for glazing. This drying phase requires patience but is critical for the success of your finished work.
The Firing Process Explained
Firing is the heat treatment that transforms raw clay into a hard, durable ceramic. In home pottery settings, there are two common firing methods: kiln firing and alternative homemade ovens. Kilns can reach very high temperatures required to vitrify clay, meaning the clay particles fuse together and become waterproof and strong. The firing schedule involves a slow, gradual increase in temperature, a hold at peak heat, and then a controlled cooldown. For beginners without kiln access, electric kilns or community pottery studios are great options. Understanding firing safety and procedures ensures your pottery will last for years.
Applying Glaze and Decorating Your Pottery
Glazing adds color, texture, and protection to your pottery, turning raw ceramics into functional and attractive pieces. Glazes are liquid suspensions of minerals that melt during firing to form a glass-like coating. Before glazing, your pottery must go through the first firing called bisque firing. When ready, apply glaze by dipping, brushing, or spraying. Experimenting with different glaze types and application techniques—like layering or sponging—can achieve unique finishes. Keep in mind that glazes can change color and texture during firing, adding an element of surprise and creativity to your work. Beginners should start with pre-mixed glazes and follow manufacturer instructions carefully.
Caring for Your Homemade Pottery
Once completed, homemade pottery can offer daily utility or adorn your living space beautifully. However, proper care is needed to ensure longevity. Most handmade pottery should be treated gently; avoid sudden temperature changes which could cause cracking. Hand washing with mild soap is preferable over dishwasher cleaning unless the piece is specifically labeled dishwasher-safe. Additionally, be mindful of the glaze’s food safety if using your pottery for dining. Displayed art pieces might require occasional dusting to preserve their aesthetic appeal. Caring for your pottery deepens the bond between maker and creation, enhancing appreciation for your craft.
Troubleshooting Common Pottery Problems for Beginners
Novices often face challenges such as cracking, warping, or glaze defects. Cracks typically occur due to uneven drying or trapped air bubbles, emphasizing why wedging and controlled drying are crucial. Warping can happen if clay shrinks unevenly during drying or firing, preventable by ensuring consistent thickness. Glaze issues like crawling or pinholes stem from improper application or firing temperatures. When problems arise, study your process to identify causes, experiment cautiously, and consult tutorial resources or local pottery communities. Remember, each mistake is a valuable learning step toward mastery.
Finding Inspiration and Advancing Your Pottery Skills
Staying inspired and continuously improving are key to a fulfilling pottery journey. Explore books, online tutorials, and pottery exhibitions to discover styles and techniques that excite you. Joining pottery clubs or taking classes offers community support and feedback. Challenge yourself with new forms, textures, and glazing processes at your own pace. Documenting your progress through photos or notes can motivate reflection and growth. Above all, embrace the creative rhythms of pottery—balancing technical skill and artistic expression—and enjoy the personal fulfillment this ancient craft brings.
Conclusion: The Joy and Fulfillment of Homemade Pottery
Making homemade pottery as a beginner opens the door to an enriching artistic practice that melds hands-on skill with imaginative design. By understanding materials, mastering foundational shaping techniques, perfecting drying and firing, and exploring glazing, beginners can create functional and beautiful pieces that reflect their personality. Along the way, patience, careful observation, and a willingness to experiment transform setbacks into wisdom. Whether making pottery for relaxation, gifts, or practical use, this craft offers a timeless connection to human creativity and tradition. Embark on your pottery journey with curiosity and dedication—you’ll uncover not just pottery skills, but a rewarding way to engage with the tactile world.
 Big O Notation Explained for Beginners
 AI in Gaming: Smarter NPCs and Environments
 Understanding Bias in AI Algorithms
 Introduction to Chatbots and Conversational AI
 How Voice Assistants Like Alexa Work
 Federated Learning: AI Without Sharing Data