How to prepare homemade ghee from butter
Ghee is a type of clarified butter that has been used in cooking for centuries, especially in Indian and South Asian cuisine. It is made by melting butter and simmering it to remove the milk solids and water, resulting in a rich, golden liquid that has a nutty flavor and a high smoke point. Ghee is a shelf-stable cooking fat that is said to have several health benefits and is commonly used as a flavor enhancer in dishes. In this article, we will explore how to make ghee at home, the science behind it, the equipment and ingredients needed, and some tips for making the perfect ghee every time.
What is Ghee?
Ghee is a traditional form of clarified butter that is commonly used in Indian and South Asian cuisines. It is made by simmering butter to separate the milk solids and water from the butterfat, resulting in a pure, golden liquid that has a rich and nutty flavor. Ghee is a shelf-stable cooking fat with a high smoke point, making it ideal for frying, sautéing, and roasting. It is often used as a flavor enhancer in dishes like curries, dal, and rice. Ghee is said to have several health benefits and is a staple in Ayurvedic medicine.
Why Make Ghee?
There are several reasons why you might want to make ghee at home instead of buying it at the store. Firstly, homemade ghee allows you to control the quality of the butter you use, ensuring that it is fresh and of high quality. You can also experiment with different types of butter to create a ghee with a unique flavor profile. Additionally, making ghee at home is relatively simple and only requires a few basic kitchen tools. Finally, homemade ghee is a more cost-effective option than store-bought ghee, especially if you use butter that you have purchased in bulk.
What Butter to Use?
The type of butter you use for making ghee can affect the flavor and quality of the final product. We recommend using unsalted, high-fat content butter, preferably organic or grass-fed butter for the most nutrient-dense ghee. Unsalted butter allows for better control of salt levels in the ghee and avoids any unwanted flavors. Grass-fed butter is a better choice for ghee as it contains more omega-3 fatty acids, vitamins A and E, and conjugated linoleic acid, all of which are beneficial nutrients.
Equipment Needed
To make ghee at home, you will need a few simple tools and equipment. A heavy-bottomed saucepan or stainless steel pan is recommended to ensure even heat distribution and prevent hot spots that can cause the butter to burn. A heat-resistant spatula or wooden spoon will be needed for occasional stirring. A fine mesh strainer or cheesecloth is needed for straining the solids from the clarified fat. Finally, you will need a clean, dry glass jar or container to store the finished ghee.
Melting the Butter
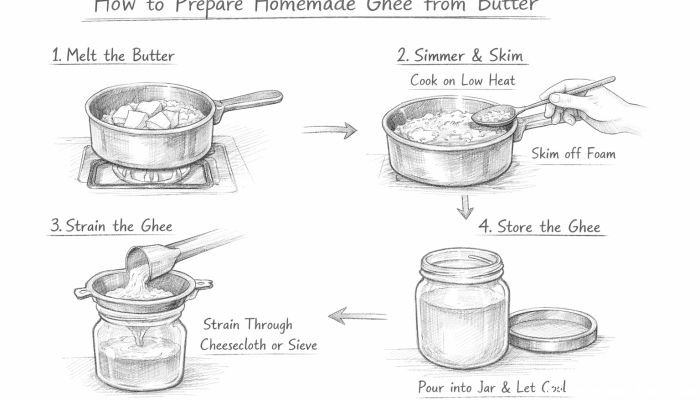
To make ghee, start by cutting the butter into evenly sized pieces. Place the butter in a saucepan over medium-low heat and allow it to melt slowly, stirring occasionally. As the butter melts, the milk solids will begin to separate from the butterfat and rise to the top, while the water content will evaporate and be released as steam. Once the butter is completely melted, reduce the heat to low and allow it to simmer gently.
Simmering Process
The simmering process is critical to making ghee. It is during this time that the milk solids will be cooked and the water content will be evaporated. As the butter simmers, you will notice bubbles forming and a nutty aroma will begin to develop. This process can take anywhere from 20 to 40 minutes, depending on the quantity of butter and the heat level. Keep an eye on the color of the butter, as it will transition from pale yellow to golden amber. Avoid letting it get too dark, as this can cause the ghee to taste burnt.
Identifying When Ghee Is Ready
It is important to know when the ghee is ready to prevent overcooking or undercooking. The ghee is ready when the bubbling has slowed down, the milk solids on the bottom are golden brown, and the aroma is nutty and fragrant but not burnt. The top layer of foam will also start to thin out. Use these visual and sensory cues to determine when to take the ghee off the heat.
Straining the Ghee
Once the ghee is ready, remove it from heat and let it cool for a few minutes. Carefully pour the ghee through a fine mesh strainer lined with cheesecloth into a clean jar or container. This will separate the browned milk solids from the clear golden liquid. The solids can be discarded or used as a flavorful addition to rice or lentils in traditional recipes. Straining is an important step in achieving the characteristic texture and shelf stability of ghee.
Storing the Ghee
One of the great things about ghee is its long shelf life. Once the ghee has cooled completely, seal the jar tightly and store it in a cool, dark place, away from direct sunlight. Ghee can last for several months at room temperature without refrigeration due to the absence of water and milk solids, which are the primary causes of spoilage. However, in warmer climates, it is best to store ghee in the refrigerator to maintain its freshness.
Uses of Ghee
Ghee is a versatile cooking fat and flavor enhancer. It has a high smoke point (about 485°F or 252°C) and is great for frying, sautéing, and roasting without breaking down or producing harmful free radicals. Ghee is traditionally used in Indian cuisine for dal, curries, and as a finishing oil for rice and breads like parathas. It can also be spread on toast, stirred into coffee or tea, or even used in baking. The rich, nutty flavor of ghee adds depth and aroma to dishes.
Health Benefits of Ghee
Ghee is not only delicious but also has several health benefits. It contains fat-soluble vitamins A, D, E, and K, and is rich in butyric acid, a short-chain fatty acid that supports gut health. Ghee is lactose-free, as the milk solids are removed during the clarification process, making it suitable for some lactose-intolerant individuals. The healthy fats in ghee may also support improved digestion, anti-inflammatory effects, and sustained energy levels. However, like all fats, it should be consumed in moderation as part of a balanced diet.
Troubleshooting
Making ghee is a relatively simple process, but some common issues may arise. If your ghee tastes burnt or bitter, the butter was likely cooked at too high a heat or for too long. If the ghee is cloudy or grainy, it might not have been strained properly or fully cleared of solids. Another common problem is the presence of moisture in the ghee, which can reduce shelf life. This may occur if the simmering time was insufficient to fully evaporate the water content. The key to making perfect ghee is patience, controlled heat, and precise timing.
Conclusion
Making ghee at home is a simple and rewarding process that can unlock a new level of flavor and nutrition for your cooking. With just a few basic tools and ingredients, you can create a rich, golden cooking fat that is shelf-stable and packed with healthy fats and vitamins. By carefully simmering and straining the butter, you can create a ghee with a unique flavor profile and a long shelf life. Whether you’re a seasoned home cook or a culinary enthusiast looking to explore traditional fats, making ghee at home is a delicious and easy way to bring the rich tastes and wholesome goodness of this ancient superfood into your kitchen.
 How to make traditional Tamil payasam
 Ethics and Impacts of Computer Graphics in 2025
 How Neural Networks Mimic the Human Brain
 How Teachers Can Adapt to Hybrid Learning Models
 How Technology is Transforming Auto Shows in 2025